Hello World-
While taking Spanish last semester my friend, Kiersten, always wore these earrings, which I always admired. Since I'm sort of crafty I wanted to try and make some myself. They worked, so I'm here to pass on my expertise.
Step 1: Pick up some "filler" buttons at Hancock Fabrics, Joann Fabrics, or your favorite fabric store.
Step 2: While at the fabric store pick up some fabulous fabric. Smaller prints, stripes, and solid colors tend to work best. Also, thinner fabric is prime.
Step 3: On the back of the buttons there is a circle- use that circle as a guide to how large of a circle the fabric should be. (If you cut out a bigger or smaller circle than suggested, it is likely the earrings won't turn out.)
Step 4: Place the top of the button (the part with the metal teeth) on the circle of fabric. With the help of an eraser, get wrap the fabric around the button.
Step 5: Once the fabric is wrapped around the button put on the top (the other piece with the slot) and make sure it snaps.
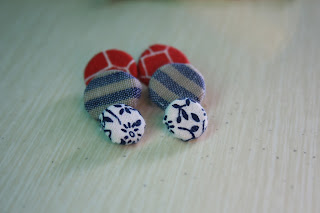
Step 6: Cut the metal piece that sticks out, so it is flush across. Glue an earring post ( I use Sterling Silver Plated) to the back-- they can be found at any craft store. Here you have you lovely button earrings! I made this particular set for my friend, Hayley, for her birthday this December. Happy making!


No comments:
Post a Comment